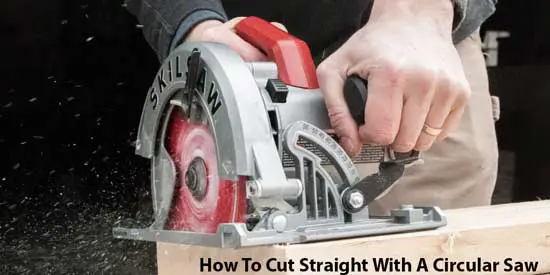
Most people only do woodwork whenever there’s a particular project in their plans. But even when it comes to a few woodworking projects a year, it is always a great idea to learn new ways to do things. One of these things could be using a circular saw for cutting straight lines.
While other types of saws are better for straight cuts, sometimes you just don’t have the time or money to go and buy one. So doing it with a circular saw is more convenient.
Today we are going to explain you three ways you can do this. Whether you want to make long or short straight cuts, or just want to have more precision while doing it – here you’ll learn how. Come and find out how!
3 Straight Cut Methods for Circular Saws
Everyone knows that the best saw for precise line cuts is always a table saw, but with the right techniques, you can do it with a circular one. You’ll just need to follow the steps to the letter and make sure you are as accurate as anyone can be.
The following methods will make your straight cuts perfect;
1. Extended Straight Cut for Thin Pieces
This one is the simplest method, and it’s focused on using just your hands, fingers, and a table. Here’s how it goes;
Securing the Board
The first thing to do is to secure the board to a stand or a sawhorse. This will help to keep the piece of wood more stable to cut it more accurately according to your needs. Here’s how;
- You’ll need to nail the part you’re not going to use to the table. Or at least nail it as close to the border as possible so you can get rid of that part eventually.
- Make sure the board or wood piece is well-secured. The nails should be tightened up well.
Drawing the Guideline
Now that you have the board secured to the sawhorses or table, it is time to draw the line or cut guide you’re going to follow.
We recommend using a pencil with a square. This will help you make the line much more precise and prevent any unwanted movement.
Attaching a Straight Table Over
To cut a thin wood piece, you’ll need to connect a thicker (at least by 2-inches) table over the one you want to cut so it can work as a fence.
- Place another table or board of the same length over the one you want to cut and use it as a guide. Make sure the edge of the table on top fits directly with the guideline you marked earlier.
- The wood should be stronger and very reliable. To attach it we recommend using either nails/screws on the edges or removable wood glue.
- For the best result, you can use a clamp in the back of the pieces of wood opposed to the place you want to cut. Make sure the clamp is not too large. If you can use two or three small clamps, it will be far better. (This only works with sawhorses)
Starting to Cut
It is pertinent to make the right cuts, so you’ll have to start the right way to prevent any issue in the process. Here’s how;
- Start by placing the blade of the saw directly in the guideline or top-table edge. The blade should be at least half an inch away from the piece of wood, close to the line.
- Then you can press your index finger into the saw shoe for making it tight and more precise while sliding.
- Now start the tool with the desired cutting level and pressure the saw to the table. Guide the saw along the guideline keeping the pressure with the fingers.
Increasing Precision
It is ideal to have the most accurate cut possible, so you’ll have to focus on making a precise cut above anything else.
- After positioning your hand on the wide part of the saw shoe, make sure you guide the saw along with the hand. Do not pressure down but forward, as your fingers will act as a guide for the tool.
- If in any moment the saw starts winding off the guideline, you can turn it off and start again from 4 to 10 inches back and try to follow the line once again. This will help you gain accuracy without damaging the uncut part with imprecise slicing.
- Always keep a firm grip on the product to prevent the tool from sliding off its guide. When you are close to finishing, make sure the saw blade goes beyond the piece of wood. Do not stop until the edge gets out entirely or the cut part falls. (Forget about this step if you don’t want to make a full cut)
This process is straightforward and shouldn’t take more than just a few minutes. We recommend it only for pieces of wood that aren’t too soft or thin. Otherwise, for any wood thicker than 3 inches, this would be the perfect process to follow.
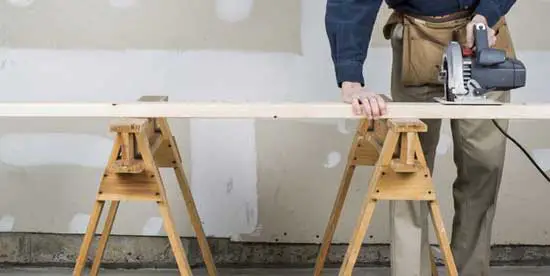
2. Long Straight Cuts for Thick Pieces
You will follow almost the same process as the above method. The difference is that this one works for thicker pieces of wood or tables, and you’ll work directly on saw horses without exception.Follow this process;
 .
.
Clamp the Wood Piece
The best to clamp a piece of wood is to use either sawhorses or a large workbench. With the stability & safety they offer, making the most precise cut possible will be easier.
- Place the sawhorse in a comfortable position in your workshop. Make sure it has enough space to all sides so you can move freely around when using.
- Now clamp the wood piece to it by using either nails or screws on the part you’re not going to use. Remember that the part to cut will be on the side with no support.
- You may also clamp the wood piece to any flat and strong surface that can hold the table without falling or moving. Using clamps, nails or screws will be enough, as long as the piece is not too thin or too heavy.
Draw the Line to Cut
Whether it is a speed square or a larger ruler, you can always mark a useful guideline for a perfectly straight cut with a circular saw. Here’s how you can do it;
- Any tool that helps to measure and mark at the same time, that’s the tool to use at first. Whether it’s a ruler, a combination or speed square, or just whatever. Remember to mark the line clearly, and as straight as possible, it will be used for the cutting.
- You may also mark the line with another long table over the one to cut. You can use the marker, pencil or an X-act to make the guideline. Make sure the edge of the top table is as straight as possible for the line to be the exact match for a precise cut.
- Take the top table off before cutting for the best results in the thick wood.
Prepare for the Cutting
Now it is time to place the circular saw on the piece to cut and prepare for a straight cut (with the circular saw off). Remember that a straight cut is even and needs to be accurate, so be sure to follow these guidelines for better results;
- Place the circular saw close to the piece of wood. The shoe, or metal frame around the saw, needs to be pressure against the table to cut. Do this with your thumb or three fingers for a stronger grip.
- Remember to grab the saw with your lead hand. And make the pressure to the shoe of the saw with the other.
- The handle of the saw should face backward or you, and you should be located precisely behind the tool for the best result when you start cutting.
- Then make sure the blade of the saw is on the opposite side of your hands. The more distant your hands are from the edge, the better.
- Lastly, make pressure to the piece of wood to cut with the saw without turning the tool on. Check that the piece is appropriately clamped to the workbench or sawhorses. If it is, you can start cutting.
Starting the Cut
It is time to start cutting the piece of wood, always after following the previous step correctly. In this one, you should be already in position and ready to slide the tool.
- Start by placing the saw at least one inch and a half away from the piece to cut. Make sure the blade of the tool is aligned with the guideline or the top table so the cut can start as precise as possible to finish the same way.
- Now, by making pressure with the hand on the handle, turn the tool on with the other hand. Then get the machine close to the wood piece and as soon as the shoe or frame of the saw touches the food, start making pressure with the hand.
Guide the Saw for Precision
The saw needs to be guided until the end of the cut if you want better results. If you want a perfect cut, you’ll have to do it in just one slide. Here’s how;
- Now that you’ve started the cut, it is time to keep doing it without stop. Remember to continue pressuring the saw against the wood piece to prevent from sliding off its guideline.
- Whenever it begins to go off-course, you can always stop the blade and start once again about 4 to 10 inches back from the last cut and resume slowly.
- Always remember that the cut demands as much precision as possible, so keep the pressure as much as you can to prevent any lousy cut, splinter or pieces flying.
This process is easier than the first one as cutting thicker wood pieces is not as hard as cutting thin ones. So make sure you follow the guidelines, and you won’t have any problem at all.
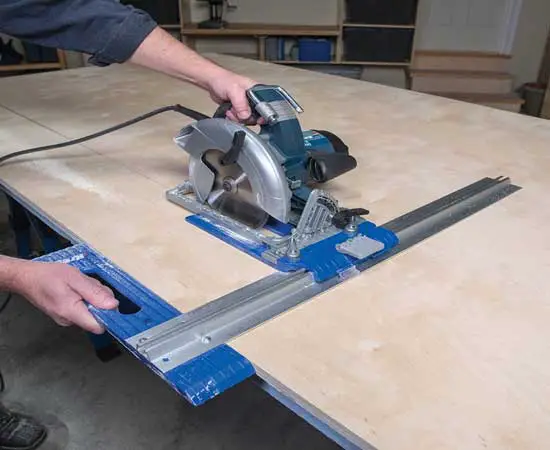
3.Straight Cut Using a DIY Jig
This method is all about creating your own jig to make the straightest cuts possible without fault. It works for either think or thick pieces of wood. You’ll need a jig that’s thick so you can eventually make it work with different thicknesses.Follow the steps for best results;

Make a Fence and a Stop for the Jig
The first step to make is the creation of a fence and a stop for the jig. This is what will help to make the cuts more effectively when needed.
- Take a plywood table or something similarly thin and make something at least half as long as the cut you want to make. We recommend having the whole length of the wood piece to cut if you want the best results. Then square all the edges as precise as possible – they should be neat.
- Now take another piece of wood to make the stop (should be thicker than the fence) and cut it precisely to make sure it is wider than the fence piece as well. It should also be stronger than the fence for the best results.
- Then calculate where to piece them together. Make sure the fence and the stop are aligned accurately. The space between the side edges of the fence and the stop should be the same length that separates the far end of the saw shoe from its blade. This will give precision.
Screw or Glue the Fence & Stop Together
With screws, you have more security and a way better leveling between the two. However, we also recommend using wood glue if you don’t feel like wasting screws, nails or force.
- Now you can use nails, glue or screws for piecing them together. Remember they should be well put as you will be using the fence as a jig for the cuts with the saw.
- After you do this, you will have the jig done. We recommend using a sander to get rid of imperfections, especially in the stop and the edge of the fence.
Make a Guide for the Wood to Cut
After gluing the fence and the stop, it is time to create the bottom guide on which the wood to cut will pass through.
- Look for a really narrow but sturdy piece of wood that can work as a guide. It should be thicker than the piece(s) of wood to cut, but it should no more than three inches wide so it can work as a guide and don’t harm the cutting process.
- Now you should open some holes in one of the narrower sides of the jig by fitting the narrow piece of wood below. With two holes it is enough, try to make them as precise as possible. They should be on the edge of the parts, but not too close to prevent any unwanted result.
- Finish off by adding the screws and tightening up the fence, the stop and the guide for the whole jig.
Prepare the Guideline for the Cut
Now it is time to prepare the piece of wood you want to cut, remember it should be as precise as possible with a ruler or square.
- Use pencil or markers, make sure the whole line is precise to prevent any unnecessary cut eventually, or making a mistake while sliding the saw.
- We recommend measuring and calculating the type of cuts you are going to make before marking. This way you can know how it’s going to be done before you do.
Place the Piece and Cut It
You have the jig ready, now it is time to make the cut. Here’s how;
- The fence should be over the piece of wood you want to cut. You can rest it over it without issues. Make sure the guide it’s on the side of the piece of wood to cut as well. And the stop should be deep in the fence, but only enough for the blade of the saw to get out a little off the edge.
- Clamp down the jig to a workbench or sawhorses. Make sure it is strong enough before you start making the cuts.
- Now start by turning on the tool and sliding it slowly across the fence and making sure it cuts as straight as possible. Remember to hold it down the fence by making pressure with fingers (as far away from the blade as possible).
This process will make the straightest cuts you can think of, without even making much of an effort. In a matter of hours you’ll have the perfect jig for circular-saw line cuts. And if you want even better results, you can place the jig against a wall to prevent it from moving.
Conclusion – Finish the Straightest Cuts and Enjoy!
Making inline cuts doesn’t have to be difficult, the previous methods made it clear. So, are you ready to make the best straight cuts with a circular saw?
Then don’t waste any more of your time and start practicing these methods. The results will surprise you.
https://www.youtube.com/watch?v=uIt4i8g7ZAc